Having issues or no longer need your Spotify but can’t find the right way to cancel the Spotify? This article will guide you on how to cancel Spotify account steps by steps.
What I noticed was when you have duplicate Spotify accounts and trying to connect both with Facebook, it won’t let you share playlist or songs on Facebook.
Cancel Spotify Account
Logging in with Facebook can let you share the music you’re listening on your FB wall and appeared in FB activity logs if you turn on the Social feature Show on Facebook.
The music streaming service only allowed one account connected to the same Facebook, so to fix this issue you have to delete either one for the other to work.

Let say you are trying to enable the Show on Facebook on B account while A is connected to Facebook, deleting or reset through Facebook app page won’t work either. All you need is to delete one that you don’t use.
Here are the steps on how to cancel Spotify Account
Step 1
Login via Spotify.com using Facebook or username.
Step 2
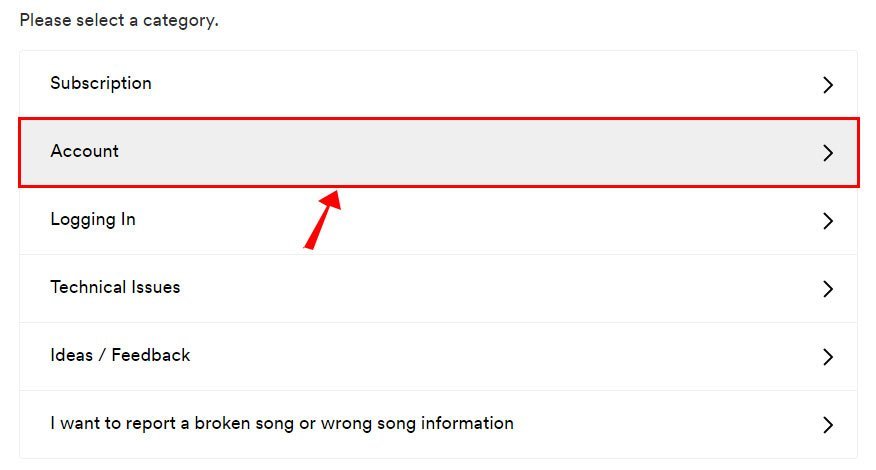
Browse to About at the bottom of the page and click on Contact Us under Customer Service and Support.
Step 3
On the Contact page, click on Account and choose I want to close my account permanently.
Step 4
Click on the Close Account button
By closing the account, the username can’t be used again and Spotify will remove all your saved music, playlists and followers, so make sure to double check properly before cancel Spotify account. If you have some other issues, you can contact the Spotify support team.